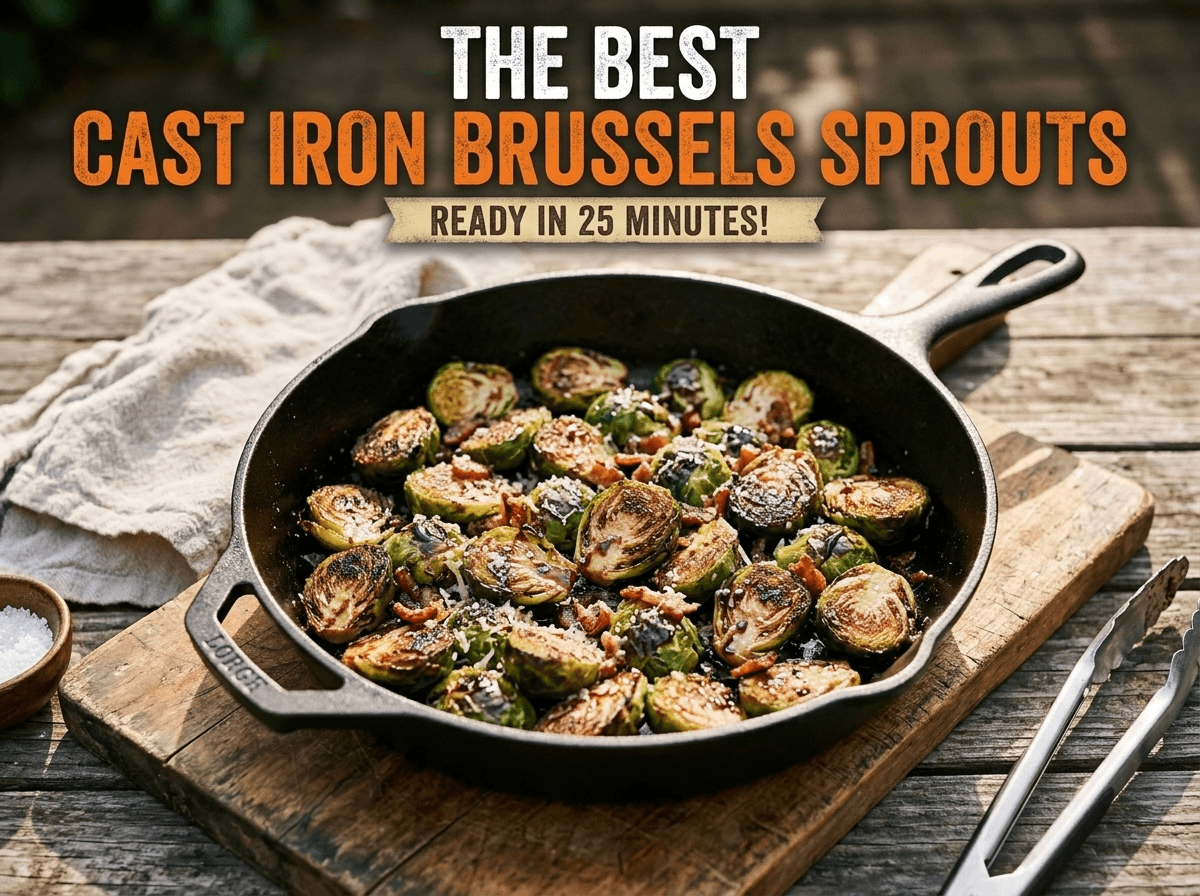
If you’ve only had boiled or steamed sprouts, cast iron Brussels sprouts will change your mind. A heavy skillet holds heat like nothing else in your kitchen. That heat gives the cut side of each sprout a deep, nutty, mahogany crust while the inside turns tender and sweet.
This recipe uses a simple two-stage method. You sear the sprouts hard on the stovetop, then finish them in a hot oven. The sear builds flavor and the oven cooks them through without burning the leaves.
You don’t need fancy ingredients. Oil, salt, pepper, and a finishing splash of something acidic do all the work. Whether you’re feeding a weeknight crowd or filling a holiday table, this is the version I’d make again and again.
Quick Answer
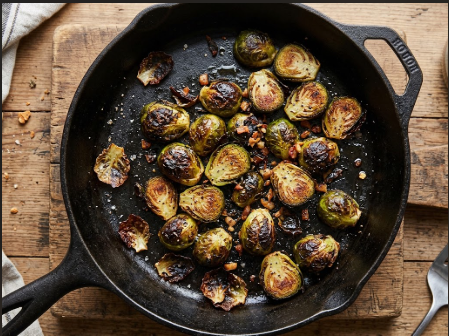
For crispy cast iron Brussels sprouts, preheat a 12-inch skillet, then sear halved sprouts cut-side down in oil over medium-high heat for 5 minutes. Transfer to a 425°F (220°C) oven for 10 to 12 minutes. Total cook time is about 20 minutes. They’re done when deeply browned and a knife slides in easily.
Why This Cast Iron Brussels Sprouts Recipe Works
Three things make this method reliable.
Cast iron holds and delivers heat. A thin sheet pan loses heat the moment cold, wet sprouts hit it. A preheated cast iron skillet stays hot, so moisture steams off fast and browning starts right away. That browning is the Maillard reaction, and it’s where the flavor comes from.
Cut-side-down searing gives you a crust. A flat cut surface makes full contact with the iron. That contact is what creates the dark, crisp face you see in restaurant sprouts. Tossing them around in the pan too early ruins it.
The oven finishes the job. Stovetop heat comes from below only. If you cook sprouts entirely on the burner, the bottoms can scorch before the centers soften. The oven surrounds them with even heat, so the middles turn tender while the outer leaves crisp up.
Together, these steps give you crispy edges, a creamy center, and almost no babysitting.
Ingredients and Equipment
Ingredients (serves 4 as a side)
- 1½ lb (680 g) Brussels sprouts
- 2 tablespoons avocado oil (or another high smoke point oil)
- ¾ teaspoon kosher salt
- ½ teaspoon black pepper
- ½ teaspoon garlic powder
- 1 tablespoon balsamic glaze, or 2 teaspoons balsamic vinegar plus 1 teaspoon honey
- 1 teaspoon fresh lemon juice
- Optional: ¼ cup grated Parmesan, 4 slices cooked bacon, or red pepper flakes
Equipment
- A 12-inch cast iron skillet. Use a 10-inch skillet if you’re cooking only 1 lb (454 g).
- Tongs or a fish spatula
- A sharp knife and cutting board
- Oven mitts or a thick towel. The handle gets very hot.
- Paper towels or a clean kitchen towel for drying the sprouts
A good vegetable knife makes the prep faster and safer. If you’re deciding between blade styles, our santoku vs nakiri comparison covers which one handles small, round vegetables better.
Substitutions
- Oil: Light olive oil works, but extra virgin olive oil can smoke at searing heat. Grapeseed or canola also work well.
- Acid: Apple cider vinegar or red wine vinegar can stand in for balsamic.
- Sweet note: Maple syrup swaps in for honey.
- Dairy-free or vegan: Skip the Parmesan. A pinch of nutritional yeast gives a similar savory kick.
- No cast iron: A heavy stainless or carbon steel skillet also works. Browning will be a little less intense.
Choosing and Prepping Your Brussels Sprouts
Prep decides whether your cast iron Brussels sprouts come out crisp or soggy, so don’t rush it.
What to look for at the store
Choose sprouts that are firm, tight, and bright green. Skip any with yellowing leaves, black spots, or a strong cabbage smell. Pick sprouts of similar size so they cook evenly. Aim for about 1 to 1½ inches (2.5 to 4 cm) across.
Fresh stalk-attached sprouts often taste sweeter than bagged ones. Bagged sprouts work fine, though, and they save time.
Washing and drying
Rinse the sprouts under cool running water, the way the FDA recommends washing fresh produce before cutting or cooking. Then dry them thoroughly. This step matters more than any other. Wet sprouts steam instead of sear.
Pat them dry with a towel, then let them air-dry on the counter for 10 minutes if you have time.
Trimming and cutting
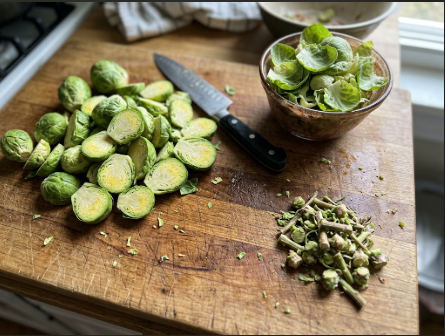
- Trim off the dry, brown stem end, about ¼ inch (6 mm).
- Peel away any loose, yellowed outer leaves.
- Cut each sprout in half from top to stem.
- Cut very large sprouts into quarters, keeping the stem end intact so the leaves stay together.
Loose leaves that fall off are a bonus. They turn into crispy, chip-like bits in the pan. Save them and toss them in.
Common Mistake: Seasoning wet sprouts and letting them sit. Salt pulls out moisture, and that water ends up steaming your sprouts. Dry them first, and season right before they hit the pan.
Step-by-Step Instructions
Before you start: Place an oven rack in the center position and preheat the oven to 425°F (220°C).
- Dry and toss. Make sure the halved sprouts are completely dry. In a large bowl, toss them with 1 tablespoon of the oil, the salt, pepper, and garlic powder.
- Heat the skillet. Set your 12-inch cast iron skillet over medium-high heat for 3 to 4 minutes. It should feel very hot when you hold your palm a few inches above the surface.
- Add oil. Pour in the remaining 1 tablespoon of oil. It should shimmer within seconds but not smoke heavily.
- Sear cut-side down. Place each sprout half cut-side down in a single layer. Use tongs and arrange them one at a time. Some may not fit, so work in batches if needed.
- Leave them alone. Cook without stirring for 4 to 5 minutes. Resist the urge to move them. Peek at one. The cut face should be deep golden brown.
- Toss and transfer. Give the pan a good shake or toss with tongs. Carry the skillet to the oven with oven mitts.
- Roast. Cook for 10 to 12 minutes, stirring once at the halfway point. The outer leaves should look dark and crispy at the edges.
- Finish. Remove the skillet and set it on a trivet. Drizzle with balsamic glaze and lemon juice, and toss. Add Parmesan or bacon if using.
- Taste and adjust. Add a pinch more salt if needed and serve right away.
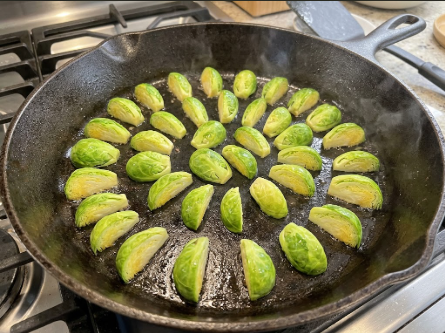
Pitmaster Tip: Don’t crowd the pan. If sprouts touch each other tightly, they trap steam and won’t brown. When in doubt, cook two batches. An extra 5 minutes beats a pan of pale, soft sprouts.
Safety note: Cast iron handles stay hot after leaving the oven. Drape a towel or silicone sleeve over the handle as a reminder. This is the easiest burn to get, and it happens when you grab it without thinking.
Time and Temperature Table
| Stage | Heat | Time | What you should see |
| Preheat oven | 425°F (220°C) | 15 minutes | Rack in center |
| Preheat skillet | Medium-high stovetop | 3-4 minutes | Hot palm test, light shimmer after oil |
| Sear, cut-side down | Medium-high | 4-5 minutes | Deep golden-brown faces |
| Roast in oven | 425°F (220°C) | 10-12 minutes | Crispy dark edges, tender centers |
| Finish and toss | Off heat | 1 minute | Glaze clings, no puddle |
| Total active cook time | About 20 minutes |
How to Tell When They’re Done
Don’t go by time alone. Ovens and skillets vary, so use these checks.
- Color: The cut sides should be dark brown, almost bronze. Pale green means they need longer.
- Texture: Pierce a thick sprout with a paring knife or fork. It should slide in with little resistance.
- Leaves: Outer leaves should look crisp and slightly charred at the tips, like thin chips.
- Smell: You’ll notice a sweet, nutty aroma, not a sulfur smell. A strong cabbage odor usually means they’re overcooked.
If the tops are crisp but the centers still feel firm, give them another 3 to 5 minutes in the oven. If the bottoms are dark but the leaves are pale, turn the oven up 25°F (about 15°C) for the last few minutes.
Resting, Serving, and Finishing
Brussels sprouts don’t need a long rest like a roast does. But give them 2 minutes off the heat so the steam settles and the crust firms up.
Serve them straight from the skillet. It looks great on the table, and the iron keeps them warm. Just put a trivet underneath.
Finishing touches make the dish:
- A drizzle of balsamic glaze for sweet tang
- A squeeze of lemon to brighten the char
- Shaved Parmesan for a salty, savory finish
- Toasted pecans or walnuts for crunch
- A little flaky salt just before serving
Season at the end rather than loading up early. Acidic and sugary glazes can burn if they go into a hot pan too soon.
What to Serve With Cast Iron Brussels Sprouts
These sprouts pair with almost any main, especially rich, smoky, or roasted meats. A few reliable matches:
- Smoked or roasted poultry: The caramelized edges cut through rich turkey. If you’re building a holiday menu, they sit nicely next to a Thanksgiving smoker recipe lineup. They also pair well with a juicy turkey breast at 250°F when you want a smaller meal.
- Ribs and barbecue: Smoky pork loves a bright, crisp vegetable. Try them beside pellet grill ribs.
- Comfort classics: A pan of sprouts is a great answer when you’re stuck on what goes with meatloaf. They also stand up to a slow-cooked pot roast.
- Steak and chops: The char matches the sear on a good steak or thick pork chop.
- Starches: Mashed potatoes, creamy polenta, or buttered egg noodles balance the bitterness.
For a no-meat dinner, toss the sprouts with farro or roasted sweet potato and finish with a fried egg.
Storing, Freezing, and Reheating Leftovers
Refrigerating
Get leftovers into the fridge within 2 hours of cooking, or within 1 hour if the room is above 90°F (32°C). The USDA’s leftover guidance says cooked leftovers stay good for 3 to 4 days in the refrigerator. Store them in a shallow airtight container.
Freezing
You can freeze cooked sprouts, but expect a softer texture. Freeze them in a single layer on a tray, then bag them. Frozen at 0°F (-18°C), they stay safe indefinitely, though quality is best within about 2 to 3 months. Use thawed sprouts in soups, hashes, or grain bowls rather than as a crispy side.
Reheating
Reheat leftovers to 165°F (74°C), per the same USDA guidance. To bring back crispness:
- Preheat a skillet over medium-high heat.
- Add a teaspoon of oil.
- Cook the sprouts for 4 to 6 minutes, stirring now and then, until hot and crisp again.
An oven at 400°F (200°C) for 8 to 10 minutes also works. Avoid the microwave if you want any crunch. It turns them soft and gives off a strong smell.
Variations
Bacon and Maple
Cook 4 slices of chopped bacon in the skillet first. Remove the bacon, leave 1 tablespoon of the fat, and cook the sprouts in it. Finish with the bacon and a teaspoon of maple syrup. If you want a method for crisp bacon without the splatter, see our guide to bacon on a pellet grill.
Cast Iron Brussels Sprouts on a Pellet Grill
Set the pellet grill to 425°F (220°C) and place the empty skillet inside to preheat for 10 minutes. Add the oil and sprouts, cut-side down, and cook for 15 to 20 minutes, tossing once at the midpoint. A mild wood like oak or apple gives a light smoke flavor without overpowering the sprouts. Skip the stovetop sear here.
Charcoal or Gas Grill
Set the skillet on the grate over direct medium-high heat, around 425°F to 450°F (220°C to 230°C). Sear the cut sides for 5 minutes, then move the skillet to the indirect side, close the lid, and cook 10 to 12 minutes. If you’re new to charcoal, our guide on how to start a grill walks through the setup.
Oven-Only Backup
Preheat the skillet in a 450°F (230°C) oven for 10 minutes. Carefully add oil and sprouts, cut-side down, and roast 20 to 25 minutes, stirring once. It’s a bit less crispy on the faces, but it’s the easiest way to cook a big batch.
Flavor Twists
- Spicy-sweet: Red pepper flakes and a spoonful of honey
- Garlic-Parmesan: Add 2 minced garlic cloves for the last 2 minutes, plus Parmesan at the end
- Hot honey: Drizzle with hot honey and top with toasted pecans
- Everything-spice: Use everything bagel seasoning before roasting
- Lemon-caper: Finish with lemon zest and a tablespoon of capers
Troubleshooting
| Problem | Likely cause | Fix |
| Soggy, steamed sprouts | Wet sprouts or crowded pan | Dry them fully and cook in batches |
| Burnt bottoms, raw centers | Stovetop heat too high or too long | Sear 4-5 minutes only, then finish in the oven |
| Pale, no crust | Skillet wasn’t hot enough | Preheat 3-4 minutes and make sure the oil shimmers |
| Bitter taste | Overcooked or very large sprouts | Pull earlier, cut large ones smaller, and add acid and a little sweetness |
| Sprouts stick to the pan | Pan not hot enough or moved too soon | Wait until they release naturally, about 4 minutes |
| Leaves burn before centers cook | Oven too hot | Lower to 400°F (200°C) and add 3-5 minutes |
| Smoky kitchen | Oil with low smoke point | Switch to avocado, grapeseed, or canola |
| Mushy centers | Cooked too long | Shorten the oven time by 3-4 minutes next time |
A note on cast iron care. Hot, acidic sauces can dull the seasoning on a skillet, especially a newer one. Add balsamic and lemon off the heat, as this recipe does. After cooking, follow your manufacturer’s care instructions: rinse, scrub with a brush, dry right away, and rub on a thin coat of oil.
Recipe Card: Cast Iron Brussels Sprouts
Yield: 4 servings as a side
Prep time: 15 minutes
Cook time: 20 minutes
Total time: 35 minutes
Equipment: 12-inch cast iron skillet, oven
Ingredients
- 1½ lb (680 g) Brussels sprouts, trimmed and halved
- 2 tbsp avocado oil, divided
- ¾ tsp kosher salt
- ½ tsp black pepper
- ½ tsp garlic powder
- 1 tbsp balsamic glaze
- 1 tsp lemon juice
- Optional: ¼ cup Parmesan or 4 slices cooked bacon
Instructions
- Preheat the oven to 425°F (220°C).
- Dry the sprouts and toss with 1 tbsp oil, salt, pepper, and garlic powder.
- Heat the skillet over medium-high for 3-4 minutes. Add 1 tbsp oil.
- Place sprouts cut-side down in a single layer. Sear 4-5 minutes without moving.
- Toss, then roast in the oven for 10-12 minutes, stirring once.
- Remove with oven mitts. Drizzle with balsamic glaze and lemon juice.
- Add toppings and serve hot.
FAQ
How long do you cook Brussels sprouts in cast iron?
Plan on about 20 minutes total. Sear them cut-side down for 4 to 5 minutes on the stovetop, then roast at 425°F (220°C) for 10 to 12 minutes. Large sprouts may need 3 to 5 extra minutes, so test with a knife.
Should you boil Brussels sprouts before roasting?
No. Boiling adds water, and water is the enemy of crispiness. Raw, dry sprouts brown better and keep a pleasant bite. If you’re worried about firm centers, cut them smaller or add a few minutes in the oven.
How do you keep Brussels sprouts crispy?
Dry them well, use a hot skillet, and don’t crowd the pan. Sear cut-side down without moving them. Add sauces and glazes at the end, and serve right away. Covering the skillet traps steam and softens the crust.
What temperature do you roast Brussels sprouts in cast iron?
Use 425°F (220°C) in the oven after a stovetop sear. For an oven-only method, preheat the skillet at 450°F (230°C). Below 400°F (200°C), sprouts tend to turn soft before they brown.
Can you cook Brussels sprouts in cast iron on the stovetop only?
Yes. Sear cut-side down over medium-high heat for 5 minutes, add 2 tablespoons of water, cover, and steam 3 minutes. Uncover and cook until the water cooks off and they re-crisp. They won’t be as evenly browned as the oven method.
Can you reheat Brussels sprouts and keep them crispy?
Yes, with a hot skillet or a 400°F (200°C) oven rather than a microwave. Cook them for 4 to 6 minutes in a skillet until hot and crisp. USDA guidance says to reheat leftovers to 165°F (74°C).
Conclusion
Great cast iron Brussels sprouts come down to a few habits: dry sprouts, a hot skillet, a single layer, and patience during the sear. Follow those and you’ll get crisp edges, tender centers, and a finish that works with nearly any main dish.
Start with the base recipe, then play with bacon, hot honey, or a pellet grill version. Once you’ve made them in cast iron, a sheet pan will feel like a downgrade.
Laura Smith

I'm Laura, I like all the kind of delicious grilled foods which makes me hungry all the time I see them. That's why I built this blog to share with you all of my Grilling experiences, recipes, and all the tips about foods that I've learned from food experts.