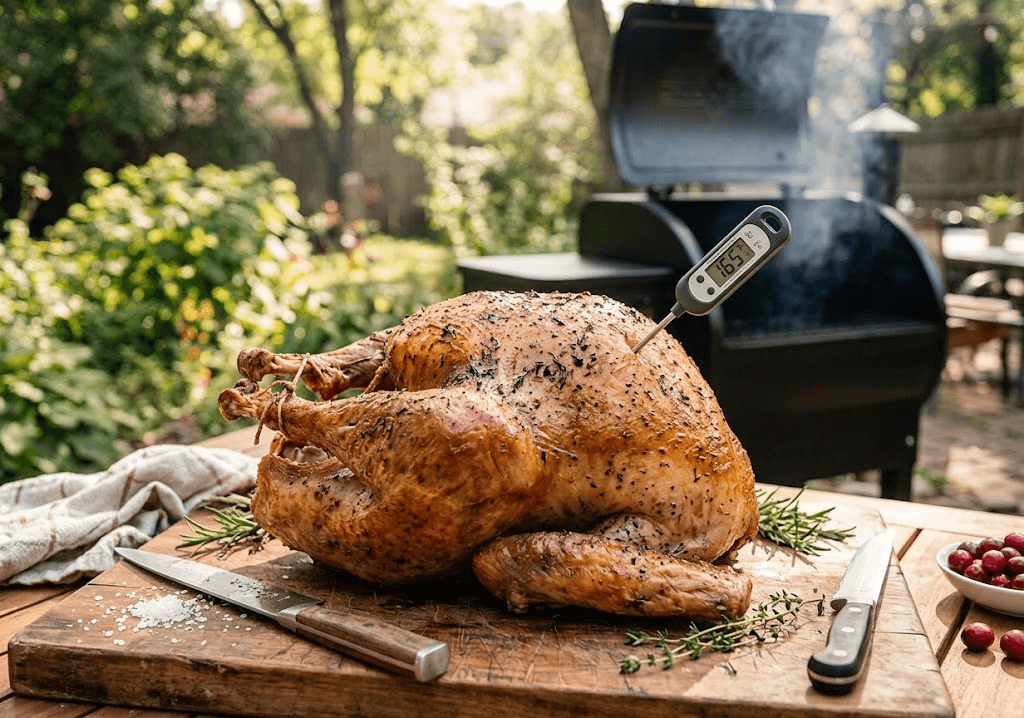
If you want juicy turkey with skin that crackles, dry brine turkey is the method to learn. It takes about five minutes of work: salt the bird, park it in the fridge, and let time do the rest. There’s no giant bucket, no sloshing water, and no fridge space lost to a cooler.
This guide covers how much salt to use, how long to brine, how to cook the turkey on a smoker or grill, and what temperatures to pull at. It also covers the mistakes that turn a good bird into a salty or rubbery one.
Quick Answer
To dry brine turkey, rub kosher salt all over the bird, about ¾-1 teaspoon Diamond Crystal per pound (0.45 kg), then refrigerate it uncovered for 24-72 hours. Pat dry, skip rinsing, and cook until the breast reaches 165°F (74°C) and the thigh hits 175-180°F (79-82°C).
What Does It Mean to Dry Brine Turkey?
A dry brine is salt applied directly to the surface of the meat, with no water added. The salt first pulls moisture out of the turkey. That moisture dissolves the salt and forms a thin brine on the surface. Over the next day or two, the meat reabsorbs that brine.
The salt changes the muscle proteins so they hold more water during cooking. The result is a turkey that loses less juice in the oven or smoker and tastes seasoned all the way through, not just on the surface.
Why dry brining works so well on turkey
Turkey is a tough bird to cook evenly. The lean breast dries out at about the time the thighs finish cooking. A dry-brined turkey is more forgiving, because the breast holds onto moisture even when it runs a few degrees warm.
The method also helps the skin. Leaving the salted bird uncovered in the fridge dries the surface, and dry skin renders and crisps far better than wet skin. A wet-brined turkey often ends up with soft, pale skin.
Dry brine vs. wet brine
Wet brining soaks the turkey in salt water, usually for 12-24 hours. It adds moisture, but it also dilutes the turkey’s natural flavor and makes the skin harder to crisp. It also needs a bucket or bag, a lot of ice, and room to keep everything at a safe temperature.
| Factor | Dry brine | Wet brine |
| Fridge space | A rimmed sheet pan | A large bucket or cooler |
| Skin crispness | Excellent | Fair to poor |
| Turkey flavor | Concentrated, natural | Can taste diluted |
| Effort | Rub with salt | Mix, chill, and haul a heavy tub |
| Mess and splash risk | Low | High |
| Pan drippings | Concentrated and good for gravy | Often too salty or thin |
For most home cooks, dry brine wins on convenience, skin, and flavor. Wet brining can still make sense for a lean, skinless turkey breast, but it isn’t needed for a whole bird.
What You Need to Dry Brine Turkey
The tool list is short, and most of it is probably in your kitchen already.
Ingredients for a 12-14 lb (5.4-6.4 kg) turkey:
- 1 whole turkey, thawed (12-14 lb / 5.4-6.4 kg)
- Kosher salt: 3-4 tablespoons Diamond Crystal, or 2-3 tablespoons Morton
- 1 tablespoon coarse black pepper
- 1 tablespoon garlic powder
- 2 teaspoons dried thyme
- 1 teaspoon dried sage
- 1 teaspoon smoked or sweet paprika (optional, for color)
- 4 tablespoons (57 g) softened butter or olive oil for the skin
Equipment:
- A rimmed sheet pan with a wire rack that fits your fridge shelf
- Paper towels
- An instant-read thermometer (a leave-in probe is a bonus)
- Poultry shears if you plan to spatchcock
- A smoker, pellet grill, kettle grill, or oven
Choosing the right salt
Salt type matters, because crystal sizes differ and a tablespoon of one brand can hold much more salt than a tablespoon of another. Diamond Crystal is flaky and light, so it measures less salty by volume. Morton kosher is denser and roughly 40% saltier per spoonful, so use less of it.
Avoid fine table salt unless you weigh it. It packs tightly, so a measured spoonful delivers far more salt and can leave the bird too salty. If you only have table salt, use about half the volume and spread it carefully.
How much salt to use
The rule of thumb is ¾-1 teaspoon Diamond Crystal per pound (0.45 kg) of turkey, or ½-¾ teaspoon Morton per pound. That works out to roughly 0.5-0.7% of the bird’s weight in salt . Use the lower end for a 48-hour brine or a salt-sensitive crowd, and the higher end for a 24-hour brine.
| Turkey weight | Diamond Crystal kosher | Morton kosher |
| 10 lb (4.5 kg) | 2.5-3.3 tbsp | 1.7-2.5 tbsp |
| 12 lb (5.4 kg) | 3-4 tbsp | 2-3 tbsp |
| 14 lb (6.4 kg) | 3.5-4.5 tbsp | 2.3-3.3 tbsp |
| 16 lb (7.3 kg) | 4-5.3 tbsp | 2.7-4 tbsp |
| 20 lb (9.1 kg) | 5-6.7 tbsp | 3.3-5 tbsp |
These are pitmaster guidelines, not USDA figures. If you own a kitchen scale, weigh the salt, since weighing removes the brand problem entirely.
Check the label before you salt
Many store-bought turkeys are already treated with salt. Look for phrases like “self-basting,” “contains up to 8% solution,” “enhanced,” or “kosher.” A kosher turkey is salted during processing too.
Dry brining one of these birds the full amount can make it unpleasantly salty. If the label shows added solution or the bird is kosher, skip the dry brine or use only a light sprinkling of about ¼ teaspoon per pound. Natural, untreated turkeys are the best candidates.
Thaw the Turkey Safely First
A frozen turkey can’t take a dry brine, because the salt won’t stick or absorb properly. Thaw it completely first, and plan the schedule around that.
The safest method is the refrigerator. The USDA recommends about 24 hours of fridge thawing for every 4-5 pounds . A 14 lb (6.4 kg) turkey needs roughly three days. Keep it in its wrapper on a tray, on the bottom shelf, so raw juices can’t drip onto other foods.
| Turkey weight | Refrigerator thaw time |
| 8-12 lb (3.6-5.4 kg) | 2-3 days |
| 12-16 lb (5.4-7.3 kg) | 3-4 days |
| 16-20 lb (7.3-9.1 kg) | 4-5 days |
| 20-24 lb (9.1-10.9 kg) | 5-6 days |
Once it’s thawed, you can dry brine for another 1-3 days and cook. Build the full timeline backward from the day you plan to serve. For Thanksgiving, that means buying a frozen turkey about a week ahead.
⚠️ Common Mistake: Rinsing the turkey before salting. The USDA advises against washing raw poultry, because rinsing splashes bacteria around your sink and counters and doesn’t make the bird safer. Pat it dry with paper towels instead.
How to Dry Brine Turkey Step by Step
Here is the full process, from fridge to rack.
- Unwrap and remove the extras. Take out the neck and giblet bag from the cavity. Save them for stock if you like.
- Pat the turkey completely dry. Use paper towels on the skin, inside the cavity, and under the wings. Dry skin holds salt better and crisps later.
- Mix the dry brine. Combine your salt with pepper, garlic powder, thyme, sage, and paprika in a small bowl.
- Season the cavity first. Sprinkle about a quarter of the mix inside the bird.
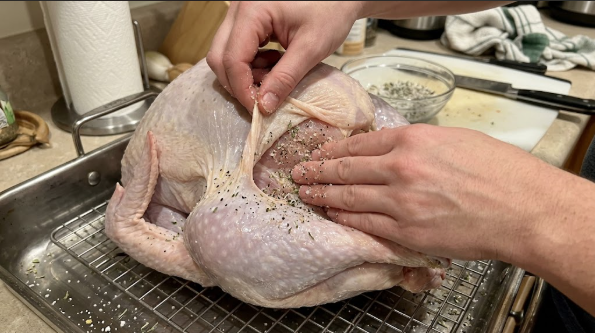
- Loosen the skin over the breast. Slide your fingers between the skin and the meat, being careful not to tear it. Rub a good portion of the salt mix directly onto the breast meat and the thighs.
- Season the outside. Rub the rest of the mix over the skin, the wings, the drumsticks, and the back. Use more salt on thick areas like the breast and thighs, and less on wing tips.
- Set it on the rack. Put the turkey, breast up, on a wire rack set in a rimmed sheet pan so air circulates all around it.
- Refrigerate uncovered. Place it on a low shelf, away from ready-to-eat food. The fridge should be at or below 40°F (4°C).
- Wait 24-72 hours. The skin will look dry, tight, and slightly translucent. That’s what you want.
How long to dry brine turkey
The best window is 48 hours, with 24-72 hours all workable. Under 24 hours, the salt seasons mostly the outer layer. Past 72 hours, the meat can turn firm and slightly ham-like, and the skin can dry out too much.
| Brine time | What to expect |
| 12-24 hours | Light seasoning, good skin, some juiciness gain |
| 24-48 hours | The sweet spot for flavor and moisture |
| 48-72 hours | Deepest seasoning, great skin; use the lower salt amount |
| Over 72 hours | Risk of cured texture; avoid |
🔥 Pitmaster Tip: If the skin looks wet or the bird has pooled liquid after a day, pat it dry again with fresh paper towels and flip the pan so the bottom gets air. A dry surface is the difference between crackling skin and leathery skin.
Should you cover the turkey?
For the first 24 hours, leave it uncovered. Air circulation dries the skin. If your fridge is crowded or you’re worried about odors, loosely tent the pan with plastic wrap for the first day, then uncover for the last 12-24 hours to dry the skin.
A uncovered turkey is safe as long as it stays cold and raw juices can’t reach other foods. Use a pan with sides, and keep the bird on the lowest shelf.
Prepare the Turkey Before Cooking
On cooking day, take the bird out of the fridge about 30-45 minutes before it goes on the heat. Don’t leave it out longer than that. A few minutes off the chill helps the skin start rendering, but long counter time is a food safety risk.
Do not rinse off the salt, and don’t add more. The surface may look slightly damp, so pat it lightly with paper towels. Then rub the skin with softened butter or oil. Butter adds flavor and color, and oil handles high heat well.
Tie the legs together loosely with butcher twine, and tuck the wing tips behind the breast. If you prefer a faster cook, spatchcock the bird. Cut out the backbone with poultry shears and press the turkey flat. A spatchcocked turkey cooks in about 40% less time and gets crisper skin across the whole bird.
For stuffing safety, the USDA recommends cooking stuffing separately, because a stuffed bird takes longer and the center can lag behind. If you stuff it anyway, the stuffing must also reach 165°F (74°C).
How to Smoke or Roast a Dry-Brined Turkey
You can cook a dry-brined turkey on a pellet grill, offset smoker, kettle, or in the oven. The target is the same: moderate heat, steady temperature, and a thermometer that decides when it’s done.
Pick your cooking temperature
Set the cooker to 325°F (163°C). That’s hot enough to crisp the skin and still gives the smoke time to flavor the meat. Lower temperatures like 250-275°F (121-135°C) work, but the skin often stays rubbery unless you finish at higher heat. For a look at the low-and-slow approach, see our turkey breast at 250 guide.
Choose your wood
Poultry takes smoke quickly, so keep it mild. Apple, cherry, and pecan give a gentle sweet smoke and a warm golden-brown color. Hickory works in small amounts. Strong woods like mesquite can turn the skin bitter.
Cooker options
Pellet grills hold a steady temperature with little babysitting, so they suit first-time smokers. If you’re shopping, our best pellet grills for beginners guide narrows the field. Offset smokers give excellent flavor but need fire management; our guide to lump charcoal in an offset smoker walks through it.
If you’re using charcoal, make sure the fire is well established before the bird goes on. If you need a refresher, read how to start a grill.
For a full menu of ideas to cook alongside it, browse our Thanksgiving smoker recipes.
Time and temperature table
These times are pitmaster estimates for an unstuffed turkey cooked at 325°F (163°C). Every bird and cooker is different, so go by temperature, not the clock.
| Turkey weight | Whole bird at 325°F (163°C) | Spatchcocked at 325°F (163°C) |
| 10-12 lb (4.5-5.4 kg) | 2.25-3 hours | 1.25-1.75 hours |
| 12-14 lb (5.4-6.4 kg) | 2.75-3.5 hours | 1.5-2 hours |
| 14-16 lb (6.4-7.3 kg) | 3.25-4 hours | 1.75-2.25 hours |
| 16-20 lb (7.3-9.1 kg) | 3.75-4.75 hours | 2-2.75 hours |
Target temperatures
The USDA’s safe minimum internal temperature for poultry is 165°F (74°C), checked in the thickest part of the breast, the innermost part of the thigh, and the innermost part of the wing [VERIFY]. That’s the number that makes the bird safe.
For better texture, pitmasters often take the thighs a bit higher, to 175-180°F (79-82°C), because dark meat has more connective tissue and tastes better when it’s cooked further. The breast, which is lean, is best when pulled promptly at 165°F (74°C).
| Part | USDA safe minimum | Pitmaster target |
| Breast (thickest part) | 165°F (74°C) | 165°F (74°C) |
| Thigh (innermost part) | 165°F (74°C) | 175-180°F (79-82°C) |
| Wing (innermost part) | 165°F (74°C) | 165-170°F (74-77°C) |
| Stuffing (if cooked in the bird) | 165°F (74°C) | 165°F (74°C) |
Don’t rely on a pop-up timer. Check the temperature in all three spots with an instant-read thermometer, and keep the probe away from bone, which reads hotter.
Cook steps
- Preheat the cooker to 325°F (163°C) and add your wood.
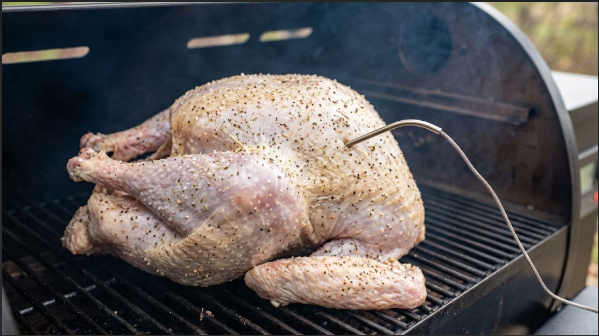
- Place the turkey breast up on the grate, or in a roasting pan with a rack.
- Insert a probe into the thickest part of the breast without touching bone.
- Cook, rotating the pan once halfway if your cooker has hot spots.
- If the skin is browning faster than the meat cooks, tent the breast loosely with foil.
- Pull the bird when the breast hits 165°F (74°C) and the thighs read 175°F (79°C) or higher.
How to Tell When Your Dry-Brined Turkey Is Done
A finished dry-brined turkey has deep golden-brown, taut skin. The drumstick moves easily in the joint, and the juices run clear when you poke the thigh. The breast feels firm but springy, not hard.
Clear juices and a loose leg are good signs, but they aren’t proof. Color can mislead, since smoke can leave meat looking pink even when it’s fully cooked. The thermometer is the only reliable check.
Look for crisp, dry skin and a thin layer of rendered fat under it. If the skin looks pale and soft, raise the heat to 400-425°F (204-218°C) for the last 10-15 minutes, watching closely.
Rest, Carve, and Serve
Rest the turkey for 30-45 minutes before carving. Tent it loosely with foil so the skin stays crisp. This gives the juices time to settle, and the temperature keeps coming up a few degrees as it rests.
Carve with a sharp, long blade. A good knife keeps slices clean and keeps the skin intact. Our picks for the best knives for cutting meat include slicers that work well on poultry.
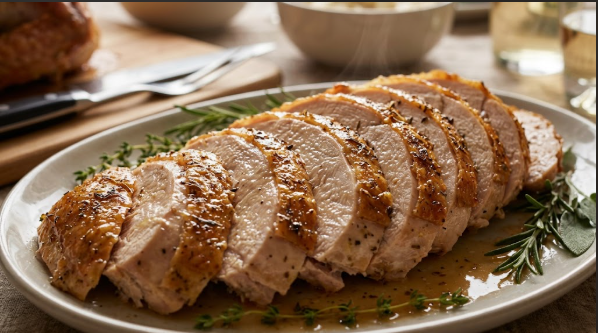
To carve, remove the legs and thighs first, then the wings. Slice the breast off the bone in whole lobes, then cut across the grain into ½-inch (1.3 cm) slices. Arrange the slices on a warm platter with the crispy skin on top.
Make gravy from the drippings
Dry-brined drippings are concentrated and flavorful, but they are also salty. Taste before you season gravy. Skim the fat, simmer the juices with unsalted stock, and thicken with a roux or slurry. Add salt only at the end, and only if it needs it.
What to serve with it
A dry-brined bird goes well with simple, savory sides. Think roasted vegetables, mashed potatoes, green beans, cranberry sauce, and a good stuffing. Our corn bread recipe makes a great base for cornbread stuffing. For dessert, try a smoked pecan pie while the smoker is still warm.
Leftovers and Food Safety
Turkey is one of those meals where leftovers matter as much as the first plate, so handle them correctly.
- Refrigerate within 2 hours of cooking, or within 1 hour if the air is above 90°F (32°C), per USDA leftover guidance.
- Slice and store in shallow containers. The meat cools faster that way. Don’t put a whole carcass in the fridge.
- Eat within 3-4 days. The FoodSafety.gov cold storage chart lists the refrigerator times for cooked poultry.
- Freeze for longer storage. Wrap tightly or use freezer bags, and label with the date. Quality is best within a few months .
- Reheat to 165°F (74°C). Add a splash of broth to keep it moist, and cover it so it steams rather than dries.
Dry-brined turkey keeps well because the salt locks in moisture. Leftover slices work in sandwiches, soups, and pot pies for days after the holiday.
Common Dry Brine Turkey Mistakes and Fixes
Most problems come down to salt amount, moisture, or temperature.
| Problem | Likely cause | Fix |
| Turkey tastes too salty | Table salt used, pre-brined bird, or too much salt | Use kosher salt by weight; skip brine on enhanced birds |
| Skin is rubbery | Wet skin, or cooker too cool | Dry uncovered in fridge; cook at 325°F (163°C) or higher |
| Breast is dry | Overcooked or cooked past 165°F | Use a probe; pull at 165°F (74°C); rest, don’t carve right away |
| Meat is hammy or firm | Brined longer than 72 hours | Stay within 24-72 hours |
| Uneven cooking | Thick breast, cold center | Spatchcock the bird or tent the breast with foil |
| Pale skin | Smoke and low heat only | Finish at 400-425°F (204-218°C) for 10-15 minutes |
| Salt didn’t penetrate | Frozen core when salted | Thaw fully before brining |
⚠️ Common Mistake: Adding more salt to the skin right before cooking. The brine already seasoned the bird, and extra salt on top can burn and taste harsh. If you want more flavor, use herbs, pepper, or butter instead.
Variations
Dry brine turkey breast. A bone-in breast needs the same rule of ¾-1 teaspoon Diamond Crystal per pound. Brine for 12-24 hours, then cook at 325°F (163°C) to 165°F (74°C). A 6-7 lb (2.7-3.2 kg) breast takes about 1.5-2 hours.
Herb butter version. After the dry brine, slide softened butter mixed with chopped thyme, sage, and garlic under the skin. Use unsalted butter, since the brine already provides the salt.
Citrus and herb version. Add the zest of two oranges or lemons to the salt mix. The citrus oils lend a bright aroma without adding moisture.
Oven backup. If the weather turns, roast at 325°F (163°C) on a rack in a roasting pan. Plan on about 13-15 minutes per pound, and rely on the thermometer. Our best rotisserie oven guide is a useful option for countertop roasting.
Charcoal kettle. Set up a two-zone fire, bank the coals to one side, and cook the turkey over the empty side with the lid on. Add a few chunks of apple wood, and keep the vents steady near 325°F (163°C).
Frequently Asked Questions
How long should you dry brine a turkey?
Dry brine turkey for 24-72 hours, with 48 hours being the sweet spot. Shorter times season mostly the surface, and longer times can firm the meat. Keep the bird uncovered on a rack in a fridge at 40°F (4°C) or below.
How much salt do you use to dry brine a turkey?
Use about ¾-1 teaspoon Diamond Crystal kosher salt per pound (0.45 kg), or ½-¾ teaspoon Morton. For a 12 lb (5.4 kg) bird, that’s roughly 3-4 tablespoons of Diamond Crystal. Use less for a longer brine and skip it on pre-salted turkeys.
Should you rinse a turkey after dry brining?
No. Rinsing adds moisture back to the skin and can splash raw-poultry bacteria around your sink. The USDA advises against washing raw poultry. Pat the surface dry with paper towels and cook it as is.
Can you dry brine a frozen turkey?
No, thaw it first. Salt can’t penetrate frozen meat, and it won’t stay put on icy skin. Thaw in the refrigerator, allowing about 24 hours per 4-5 lb (1.8-2.3 kg), then dry brine for another 1-3 days.
Is dry brine or wet brine better for turkey?
For most cooks, a dry brine is better. It gives crisper skin, more natural turkey flavor, and needs only a sheet pan instead of a bucket. Wet brines add water weight but can dilute flavor and leave skin soft.
Can you dry brine a pre-brined or kosher turkey?
You shouldn’t use a full dry brine. Kosher and “enhanced” turkeys are already salted, so extra salt can make the meat too salty. Check the label, and use only a light seasoning of herbs and pepper, or a pinch of salt.
Final Thoughts on How to Dry Brine Turkey
To dry brine turkey, you need kosher salt, a rack, a sheet pan, and a little patience. Salt the bird at ¾-1 teaspoon of Diamond Crystal per pound, leave it uncovered in the fridge for 24-72 hours, and cook it at 325°F (163°C) until the breast hits 165°F (74°C).
Check the label for pre-salted birds, never rinse, and let the thermometer decide when it’s done. Rest the turkey, carve it clean, and you’ll have juicy meat and crisp skin without the bucket. Once you’ve dry brined a turkey, you probably won’t go back to a wet brine.
Laura Smith

I'm Laura, I like all the kind of delicious grilled foods which makes me hungry all the time I see them. That's why I built this blog to share with you all of my Grilling experiences, recipes, and all the tips about foods that I've learned from food experts.